 |
| ตัวอย่างการใช้งานกับรูปภาพ ภาพ : https://github.com/alankbi/detecto |
วันนี้ผมจะมาแนะนำเครื่องมือทำระบบจดจำวัตถุง่าย ๆ ด้วย detecto กันครับ
detecto เป็นไลบารีสร้างโมเดล computer vision กับ PyTorch สำหรับงาน Image Recognition รองรับ transfer learning กับข้อมูลที่สร้างขึ้นมาใหม่ รองรับรูปภาพและวิดีโอ
 |
| ตัวอย่างการใช้งานกับวิดีโอ ภาพ : https://github.com/alankbi/detecto |
การทำงาน ตัว detecto ใช้โมเดล pre-trained Faster R-CNN ResNet-50 FPN ในการทำงาน
การติดตั้ง detecto
ก่อนอื่นให้ติดตั้ง PyTorch ก่อน โดยเข้าไปอ่านวิธีติดตั้ง PyTorch ได้ที่ pytorch.orgพอติดตั้ง PyTorch เสร็จแล้ว สามารถติดตั้ง detecto ได้ด้วยคำสั่ง
pip install detecto
จากนั้น เรามาลองใช้งานกันดูครับ
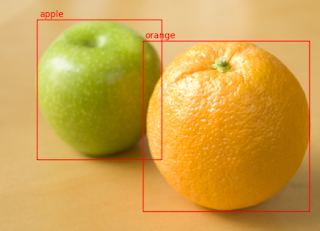
หากเรามีภาพ
 |
| Photo by an_vision on Unsplash |
Google Colab : https://colab.research.google.com/drive/1q8U1cgzFc8LxDKUBCxInMBoqfHzKV2tV?usp=sharing
โค้ด
from detecto.core import Model
from detecto import utils, visualize

model = Model() # เรียกใช้งานโมเดล

image = utils.read_image('photo-1568702846914-96b305d2aaeb?ixlib=rb-1.2.1') # ดึงข้อมูลไฟล์รูปภาพเข้ามา

labels, boxes, scores = model.predict(image) # รับ labels, พิกเซส และ scores
predictions = model.predict_top(image) # รับเฉพาะ labels ที่มี scores สูงสุด

visualize.show_labeled_image(image, boxes, labels) # โชว์ผลลัพธ์ภาพบน Ipython notebook
ผลลัพธ์

ต่อไป เรามาลองสร้างชุดข้อมูลรูปภาพของเราเองเพื่อนำมา transfer learning ด้วย detecto กัน
ขอขอบคุณภาพจาก SpaceX (CC BY-NC) source : https://www.flickr.com/photos/spacex/
ขั้นตอนแรก เรากำหนดโจทย์ จะทำระบบตรวจจับตำแหน่งจรวดอวกาศ

ขั้นตอนที่สาม โหลด labelimg จาก https://tzutalin.github.io/labelImg/ มาจะได้หน้าต่างดังนี้
หากตรง PascalVOC เป็น yolo ให้คลิกให้เป็น PascalVOC
 คลิกให้เป็น

จากนั้นจะมีช่องให้พิมพ์ label บริเวณรูปภาพที่ต้องการ ในนี้เป็น rocket แล้วกด OK


project/ต่อไปให้สร้างโฟลเดอร์ train_labels กับ val_labels ใน project จะได้
images/
.. รูปภาพ.jpg
.. รูปภาพ.xml
project/
train_labels/
val_labels/
images/
.. รูปภาพ.jpg
.. รูปภาพ.xml
แล้วเขียนโค้ดสำหรับแบ่งไฟล์ xml ในโฟลเดอร์ project กัน แล้วรัน
import glob
from shutil import copyfile
from sklearn.model_selection import train_test_split


path = './images/'
files = [f.split('images\\')[-1].replace('.xml','') for f in glob.glob(path + "*.xml", recursive=True)]
files.sort()
train,val=train_test_split(files, test_size=0.1, random_state=42)

for i in files:
    copyfile('./images/'+i+'.xml','./train_labels/'+i+'.xml')

for i in val:
    copyfile('./images/'+i+'.xml','./val_labels/'+i+'.xml')
จากนั้น ไปขั้นตอนต่อไปกัน
ขั้นตอนที่สี่ ฝึกสอนโมเดล โดยใช้โค้ดดังนี้
from detecto import core, utils
from torchvision import transforms
import matplotlib.pyplot as plt

# Convert XML files to CSV format
utils.xml_to_csv('train_labels/', 'train_labels.csv')
utils.xml_to_csv('val_labels/', 'val_labels.csv')

# Define custom transforms to apply to your dataset
custom_transforms = transforms.Compose([
    transforms.ToPILImage(),
    transforms.Resize(800),
    transforms.ColorJitter(saturation=0.3),
    transforms.ToTensor(),
    utils.normalize_transform(),
])

# Pass in a CSV file instead of XML files for faster Dataset initialization speeds
dataset = core.Dataset('train_labels.csv', 'images/', transform=custom_transforms)
val_dataset = core.Dataset('val_labels.csv', 'val_images')  # Validation dataset for training

# Create your own DataLoader with custom options
loader = core.DataLoader(dataset, batch_size=2, shuffle=True)

model = core.Model(['rocket'])
losses = model.fit(loader, val_dataset, epochs=5, learning_rate=0.001, verbose=True)

plt.plot(losses)  # Visualize loss throughout training
plt.show()

model.save('model_weights.pth')  # Save model to a file

# Directly access underlying torchvision model for even more control
torch_model = model.get_internal_model()
print(type(torch_model))
เพียงเท่านี้เราก็ได้โมเดล Image Recognition ตรวจจับจรวดอวกาศแล้ว ส่วนเวลาเรียกใช้งานเพียงแค่ใช้คำสั่ง
from detecto.core import Model
from detecto import utils, visualize


labels = ['rocket']  # อย่าลืมพิมพ์ label ที่เราสร้าง

model = Model.load('model_weights.pth', labels)

image = utils.read_image('photo-rocket.jpg') # ดึงข้อมูลไฟล์รูปภาพเข้ามา

labels, boxes, scores = model.predict(image) # รับ labels, พิกเซส และ scores
predictions = model.predict_top(image) # รับเฉพาะ labels ที่มี scores สูงสุด

visualize.show_labeled_image(image, boxes, labels) # โชว์ผลลัพธ์ภาพบน Ipython notebook
อ่านเอกสารเพิ่มเติมได้ที่ https://detecto.readthedocs.io
GitHub : https://github.com/alankbi/detecto


ผม train ข้อมูลเองแล้วมีปัญหา runtimeerror : expected object of scalar type Long but got scalar type Float for argument #2 'other'
ตอบลบต้องแก้ยังไงดีครับ
ผมลองใช้ window 10 pip install detecto ได้ปกติ ใช้ python.3.8.3 แต่เวลาทำงานไม่สามารถ import module detecto
ตอบลบผมติดตั้ง pytorch, detectoบนwin10 ได้ครับแต่เนียกใช้ detectoไม่ได้
ตอบลบ